How to install Ubuntu on your Asus ZenBook Pro

I recently got a new laptop, the Asus ZenBook Pro UX480FD. I immediately tried to install Ubuntu on it, but I ran into some problems which cost me half a day to fix. So I decided to write this article to help anyone out that also wants to install Ubuntu on an Asus ZenBook Pro.

Enabling dual-boot support

These steps are based on http://triplescomputers.com/blog/uncategorized/solution-switch-windows-10-from-raidide-to-ahci-operation/

  1. Decide whether you want dual-boot or just Ubuntu. If you just want Ubuntu, skip to “Installing Ubuntu
  2. Boot into Windows, we have to make the Windows installation support the AHCI disk driver
  3. Press the Windows button to open the start menu
  4. Start typing “cmd”, right-click on the item and execute as Administrator
  5. Type this command and press ENTER: bcdedit /set {current} safeboot minimal
  6. If this command does not work for you, try bcdedit /set safeboot minimal
  7. Restart the computer and enter BIOS Setup (hold F2 on boot to get into BIOS, you can also enter BIOS from Windows by using advanced startup options)
  8. On the Advanced tab, Change the SATA Configuration > SATA Mode Selection to AHCI from Intel RST
  9. Go to “Save & Exit” tab and Save changes and exit Setup and Windows will automatically boot to Safe Mode
  10. Open command prompt again: Start typing “cmd”, right-click on the item and execute as Administrator
  11. Type this command and press ENTER: bcdedit /deletevalue {current} safeboot
  12. If you had to try the alternate command above, you will likely need to do so here also: bcdedit /deletevalue safeboot
  13. Reboot once more and Windows will automatically start with AHCI drivers enabled.
  14. You can now shrink the Windows partition to make some space for Ubuntu, follow this article to do so: https://docs.microsoft.com/nl-nl/windows-server/storage/disk-management/shrink-a-basic-volume

Installing Ubuntu

  1. Download Ubuntu (I used 18.04, I could not get 19.04 to work)
  2. Create a bootable USB from the downloaded ISO (follow this tutorial if you don’t know how)
  3. Attach the USB stick to your laptop
  4. Reboot the laptop
  5. Enter the BIOS by holding F2 during boot, if that doesn’t work you can also enter BIOS from Windows by using advanced startup options
  6. If you didn’t follow the “Enabling dual-boot support” steps, on the Advanced tab, Change the SATA Configuration > SATA Mode Selection to AHCI from Intel RST
  7. On the “Save & Exit” tab, override the boot option, select the USB that you created
  8. The Ubuntu install will show a list of options, select “Install Ubuntu”, don’t press Enter, but press the “e” button to edit the startup options. The default Ubuntu doesn’t like the NVIDIA graphics cards, so it will hang when you don’t do this. Note that the install be in low resolution (800×600)
  9. From the linux line, remove “quiet” and “splash”, and add “nomodeset”
  10. Do the installation like you normally would
  11. Remove the USB stick
  12. Boot the laptop
  13. Select “Ubuntu” in the startup options, press “e” and from the linux line, remove “quiet” and “splash”, and add “nomodeset” again
  14. Go into Ubuntu, open the terminal and execute “sudo apt update”, then execute “sudo apt install nvidia-driver-390”
  15. Reboot
  16. You should now have a fully working ZenBook Pro on Ubuntu 18.04!

“Failed to start MokManager” / “import_mok_state() failed”

If you tried installing before this tutorial, it might be that your installation ended up in an unbootable state. You can read the following article to fix that: How to fix “Failed to start MokManager” / “import_mok_state() failed” after failed Ubuntu Installation

Posted in Uncategorized | 20 Comments

How to fix “Failed to start MokManager” / “import_mok_state() failed” after failed Ubuntu Installation
I managed to get my ZenBook pro Ubuntu installation in a broken state by cancelling the installation after entering a password for UEFI secure boot. I had to cancel the installation because the SSD wasn’t recognized. I got the following error:

Failed to open \EFI\BOOT\mmx64.efi – Not Found
Failed to load image \EFI\BOOT\mmx64.efi: Not Found
Failed to start MokManager: Not Found
Something has gone seriously wrong: import_mok_state() failed

The reason that this error occurs is because the installation set a few variables in the UEFI variable store that it should initialize the MOK manager (the MOK manager is used to enroll keys in UEFI). It should initialize the MOK manager, but only when the installation succeeded.

The way I got this fixed was eventually pretty easy, but it took me some time to find out:

  1. Enter your BIOS (I used holding F2 while booting)
  2. Go to the “Boot” tab
  3. Use “Add New Boot Option”
  4. Press enter on “Add boot option”
  5. Enter your boot title, I just named it “ubuntuinstall”
  6. Press enter on “Path for boot option”
  7. Select your USB
  8. Select UEFI
  9. Select BOOT
  10. Select grubx64.efi
  11. Press Create
  12. Reboot, and enter BIOS again
  13. Go to “Save & Exit” tab
  14. Use Boot Override to launch your just created “ubuntuinstall” option
  15. Ubuntu will now properly boot the installation again and you can now install it properly
Posted in Uncategorized | 14 Comments

Using Spotify on your OUYA in landscape

Soooo… You just got your new OUYA, but you’re missing music?

You can use this tutorial to understand how to sideload apps:

http://www.xbmchub.com/blog/2013/06/02/how-to-install-xbmc-to-the-ouya-gaming-console/

  1. In step 6 use http://jeroen.pro/spotify.php
  2. In step 15, use “com.spotify.mobile.android.ui-*-v*.apk”.In which the asterix is the version numbering.
  3. Stop at step 23, and just launch Spotify.

Notice: I made this special download because the version on m.spotify.com is outdated, and looks horrible on your OUYA.

Here are some previews of Spotify running on my OUYA:

Playlist

Playlist

Playing

Playing

Home with sidebar

Home with sidebar

Have fun!

Update: The login screen is in portrait mode, once you are logged in, you will have landscape.

Posted in Uncategorized | 2 Comments

Totals with Munin

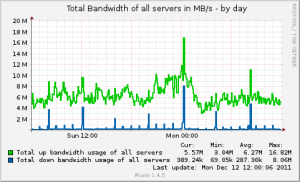
If you are addicted to graphs, like me, you will like this one. You will be able to generate the following graph:

It combines the bandwidth statistics of the given servers, and creates a awesome graph for it.

Put the following code below your host-tree:

 Text | 
 
 copy code |
?

1
bandwidth.graph_title Total Bandwidth of all servers in MB/s
2
  bandwidth.totalup.sum [server1]:if_eth0.up [server2]:if_eth0.up [server3]:if_eth0.up [server4]:if_eth0.up
3
  bandwidth.totalup.label Total up bandwidth usage of all servers
4
  bandwidth.totaldown.sum [server1]:if_eth0.down [server2]:if_eth0.down [server3]:if_eth0.down [server4]:if_eth0.down
5
  bandwidth.totaldown.label Total down bandwidth usage of all servers

Replace [server1] – [server4] with your server names, use the server names that you used in your host tree.

Basically it generate 2 lines, upload and download, and uses the “sum” function to get the total of all servers combined,

Posted in Uncategorized | 1 Comment

jQuery Mobile – Google Ads and Google Ads Mobile combined

Some time ago I had to combine Google Ads and Google Ads Mobile on my page, Google Ads for the tablets, Mobile for the mobile devices.

First I added the following HTML/JavaScript before the body tag:

 HTML | 
 
 copy code |
?

01
<div id="adsense_mobile_top" style="display:none;">
02
    <script type="text/javascript"><!--
03
      window.googleAfmcRequest = {
04
        client: 'xxx',
05
        format: 'xxx',
06
        output: 'html',
07
        slotname: 'xxx',
08
      };
09
    //--></script>
10
    <script type="text/javascript"    src="http://pagead2.googlesyndication.com/pagead/show_afmc_ads.js"></script>
11
</div>
12
<div id="adsense_top" style="display:none;">
13
    <script type="text/javascript"><!--
14
        google_ad_client = "xxx";/
15
        google_ad_slot = "xxx";
16
        google_ad_width = xxx;
17
        google_ad_height = xxx;
18
        //-->
19
    </script>
20
    <script type="text/javascript"
21
    src="http://pagead2.googlesyndication.com/pagead/show_ads.js">
22
    </script>
23
</div>

Make sure you fill in your own Adsense data.

Then I added the following HTML code to the place where I wanted the ad to be:

 HTML | 
 
 copy code |
?

1
<div id="google_ads_top">
2
            <div align="center">
3
            </div>
4
</div>

Then I added the following javascript before the body tag:

 Javascript | 
 
 copy code |
?

01
<script type="text/javascript">
02
function loadAd(){
03
    var mobile = (/iphone|ipad|ipod|blackberry|mini|windows\sce|palm/i.test(navigator.userAgent.toLowerCase()));    
04
    var ads_top = $("#adsense_top").find("iframe");    
05
    if (mobile || ((/android/i.test(navigator.userAgent.toLowerCase())) && (/mobile/i.test(navigator.userAgent.toLowerCase())))) {  
06
        ads_top = $("#adsense_mobile_top").find("iframe");
07
    }
08
    else
09
    {
10
        ads_top.css('position', 'static');
11
    }
12
 
13
    $(ads_top).appendTo("#google_ads_top div");
14
    $("#adsense_top").remove();
15
    $('div').live('pagehide',function(event, ui){
16
        $(ads_top).appendTo("#google_ads_top div");
17
    });
18
}
19
$('div[data-role=page]').live('pageshow', loadAd);
20
</script>

And there you have it, a website that gets a new ad on every pageview, and selects the ad on the kind of device you have.

There are multiple ways to base ads on the kind of device, but I needed a JavaScript solution because I just heavy cache on the pages. PHP selecting won’t work.

Posted in Uncategorized | Leave a comment

Adding advertisements in iUI

Ever tried adding advertisements to a iUI page?

I tried for a couple of hours until I was tired of “thinking the JS way” and went for the easy(and ugly) solution called iframes. I added the following code and it worked perfectly:

 HTML | 
 
 copy code |
?

1
<iframe scrolling="auto" frameborder="0" style="width:100%; min-height: 300px;" src="/ad.html" sandbox="allow-same-origin allow-forms allow-scripts" allowtransparency="true">

In the ad.html you add the advertisement javascript.

iUI fails with advertisements because it doesn’t support document.write, and all ad platforms I know use it. document.write will only work on the homepage, dynamically loaded pages will fail with document.write and will become a white page with only the ad.

Posted in Uncategorized | Leave a comment

Picking a random server with PHP(with server online checking)

Some time ago I was facing a challenge, making a PHP script that randomly picks a server from a server list, to create a load balancing effect. The script expects that the servers are replicated, so that only the server name need to be provided. Resulting resources would be like:

http://alpha.jeroen.pro/static/background.jpg
http://beta.jeroen.pro/static/background.jpg

Continue reading

Posted in Uncategorized | 1 Comment

OpenVPN stats/status page using PHP

Yesterday I was facing a problem that I don’t face many times: Something isn’t widely documented on the internet.

In this case it was about OpenVPN, the status of the server, per client, more specifically. After doing some searching on the internet I figured that OpenVPN isn’t used much, or that only pro’s use it and they write their own code anyway.

The only thing I found was a very basic(and non-working) PHP page from 2005, and a simple PHP script(also from 2005) that parses the logfile and shows the current status. I decided to base my script on that.

Continue reading

Posted in Uncategorized | 2 Comments